Friday, October 29, 2021

Photoshop Videos


Photoshop Tools


https://youtu.be/2cQT1ZgvgGI

Eyedropper Tool:

The eyedropper tool is going to be a very useful tool within photoshop. It allows you to pick up a color off of the image. Instead of trying to find a color in the color wheel, the eyedropper directly selects a color you click on in the image. This will be a very easy tool to use and doesn't require much skill to use. You can store colors you pick up with the eyedropper tool in your color palette and use the eyedropper tool to fill in areas with a specific color.


https://youtu.be/2cQT1ZgvgGI

Healing Brush Tool:

The healing brush tool lets you cover up any unwanted areas. It takes an existing part of the image and you can basically lay it on top of another area. For example in the video/image above, he wanted to cover the reflection of the person in the video so with the healing brush tool he will select a part of the water where there is no reflection and place it on top of the reflection of the person to cover it. And then he can proceed to blend it in and make it look like that person was never there. I feel like this tool can be a little difficult to use at first for a beginner, but with practice it can definitely be very useful to clean up any images.


https://youtu.be/2cQT1ZgvgGI

Blur Tool:

The blur tool can be used to blur out any unwanted areas in a photo. For example in the video.image above, he blurred out the mans face because he did not want it to be prevalent in the image. It can be used to blur out both big or small details. I think the blur tool is a pretty beginner user friendly tool. It can be useful when working within photoshop. The blur tool can also be used to possibly add some dimension and texture into images.


Thursday, October 28, 2021

Self Portrait


Self Portrait

My self portrait took me about 4 hours to do. The outlining was pretty easy for the most part but I struggled a bit with connecting some of the lines. The coloring took a little longer than the outlining just because there were more areas to fill in. Figuring out where to put the shadows and highlights was a little difficult too because I didn't want the placement or colors to look awkward. The most difficult part for me was the hair. I used multiple strands of hair with different colors, lengths, widths, and opacities to add depth and texture since my hair was a little wavy in the original photo. And then for the propaganda I chose "Love Yourself First" because I am a firm believer in yourself always coming first. You can't love other people before you love yourself, and I am big on self love. And I put little hearts around the poster to represent love. Overall, I am pretty happy with how my self portrait turned out!


Logo


Logo

For my logo I chose to do a beach aesthetic with waves and the night sky filled with the moon and stars. I chose to do this because I love the beach, hence why I moved from Illinois to Florida. The beach is one of my safe places. Along with the nighttime. The nighttime is when I am the most energetic, happy, and productive. The beach at night is the perfect combo. I also really love the sky in general. I love cloud gazing and star gazing. Looking at the constellations is really relaxing. My favorite logo out of the four is the bottom left corner. I feel like I chose darker colors, specifically blues and purples because those give off a more relaxing tone/mood. And then I chose to make the moon a yellow/orange color to give some contrast to the rest of the colors in the logo. The white stars give contrast against the dark blue, almost black, sky. The logo took me about 2 hours to make because I knew exactly what I wanted to do and wasn't too complicated to make, just a lot of curves for the waves. The stars were a little difficult to make but I think they turned out decent. Overall, I am really happy with how this logo turned out!


Monday, October 18, 2021

Dear Future Nicole


Dear future Nicole, I hope you are doing well and living your best life. I am writing to you 20 years in the

future from now. By now, you would be 38 years old. Hopefully you made it through

college and if not I hope you are working a job or two that you really enjoy and making

money to travel. I wonder if you made it through college and went on to vet school to

become a successful veterinarian like you always dreamt of as a child or if you chose a

different path along the way. Either way, you hopefully have gotten to travel to new cities,

states, countries, and many new places. Maybe taken a few road trips and flights to go out

and explore. Some places you always wanted to visit were Greece, Aruba, Bali, Italy, and

many more. So, I hope those are all crossed off your bucket list of places to travel to!

I wonder if you actually found someone you are interested in and have a possible family.

You could be married and have one or two kids along with one to three dogs like you

wanted. Maybe you have a beautiful home located near a beach like you always dreamt

of having. I hope you continued to take photos of all the places you’ve gone to and seen

and continued your small hobby of videography of all your trips to be able to look back

on. Those were always my favorite! If being a veterinarian didn’t work out, then what

path did you go down. What career did you go into and do you enjoy it or them? I hope

you are living your best life like you always wanted and are getting to explore so many new parts of the world. Traveling has always been your main goal and priority in life,

so I hope that is what you have been able to accomplish in the last 20 years. 


My calligram is in the shape of a plane. My letter to my future self reflected how I hopefully got to travel the world within the next 20 years of my life. My future plans are to get a job or two and work a ton to save up as much money as possible to be able to buy myself an apartment or house, a new car, and be able to go out and explore. I want to experience everything the world has to offer and not be stuck in one place my whole life. I want to travel and experience all of this while I am still young. So, in my future letter I cover my hopes of achieving all those goals and dreams the past 20 years. I was debating choosing between a van and/or a plane as my image. I went with a plane because I have plans of possibly becoming a flight attendant to pursue my dreams of traveling. 


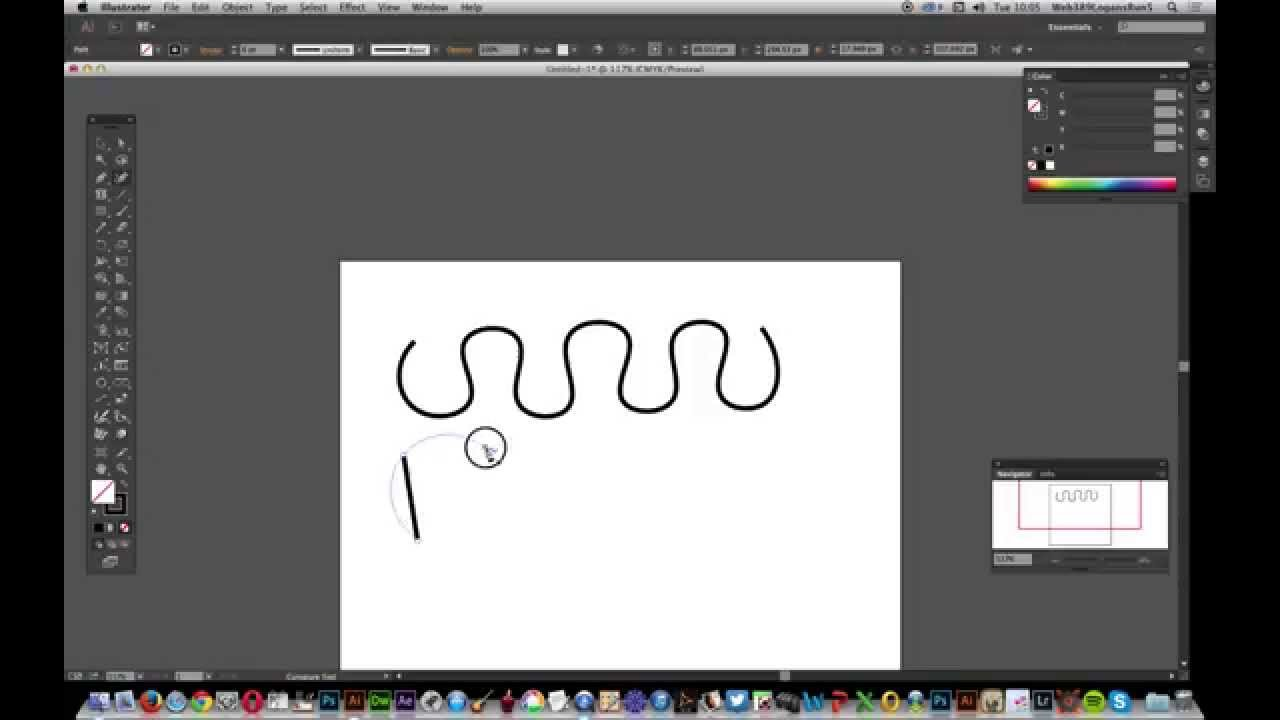
I used the curve tool a lot for a few different parts of the plane in the image. The curve tool is one of my favorite tools because it helps make the image not look so boxy and rectangular. Adding curves gives the image more depth and character. A lot of the curves were incorporated in the clouds surrounding the plane also. 


Tuesday, October 5, 2021

Illustrator Videos


The Curvature Tool

https://www.youtube.com/watch?v=XnJByIkcUS0 


The curvature tool is going to be a very important tool that is going to be used often. I think it will be pretty hard to use at first and will be a bit of a learning process. There are many different types of curves you can make. They can vary in length, the amount of curves, etc. This tool can be used to round out any corners, get rid of harsh lines, and just make those curved lines needed for images. Curves add more depth and character to your projects instead of just having plain, straight lines. The curvature tool allows you to be more creative and use it in more ways. This video, specifically talking about the curvature tool, was interesting to watch because it shows how many options there are of using the tool. There are so many different ways to use the tool to create your image. 


The Blend Tool

https://www.youtube.com/watch?v=-JjR4XNJ-eo 


The blend tool is going to be an essential and heavily used tool within Illustrator. It will allow you to play around with colors and different gradients. This tool is going to be used within your projects to create more depth and uniqueness in your images. Blends are very important to know how to use and should be used to your advantage. The blend tool can be used to get rid of sharp lines or get rid of boring, plain solid colors. What I found interesting about this video is how the blend tool can be incorporated in your art. It can be used for backgrounds or to fill in certain shapes. The choices are endless with the blend tool.


The Eraser Tool

 https://www.youtube.com/watch?v=GnWTaBfK3c4 


The eraser tool is going to be one of the key tools in the whole illustrator application. The eraser tool can serve different functions. Of course it can be used to erase any mistakes, but can also be used to clean up your art and be used to make purposeful void spaces in your art. The eraser tool also gives you the option to change the sizing of the tool. You can make the eraser super small to be more precise or super big to erase a bigger general area. Although this tool is very basic and simple, it is one of the essential tools that are going to be used very often.